Posts

Dan Wassink

iPhone interface designer Imran Chaudhri on Apple’s flaws

I love reading these early stories on the iPhone development.

iPhone interface designer Imran Chaudhri on Apple’s flaws:

“Very early on, when we first started building prototypes of the phone, a couple of us were lucky enough to take them home… By using the phone and living with the phone, I had friends all over the world who were hitting me up all the time and the phone was pinging and the light was going on, so I realized for us to coexist with this phone, we needed to have something to act as a gatekeeper. Very early on, I designed what ultimately became Do Not Disturb.”

Did You Know Your EarPods Work as a Remote Shutter Button for Photos?

Tip headphones demo

Have you ever wanted to compose the perfect photo with the Camera app on the iPhone and then been unable to tap the shutter button without jiggling the iPhone and blurring your photo? This happens to me when I try to take a selfie more than not (I’m new at the selfie game). One solution is to press one of the volume buttons on the side, but that sometimes doesn’t work either. Well if you have your EarPods connected to your iPhone, you can also press one of the volume buttons on the EarPods to take a photo. Bonus tip—the EarPods’ buttons also work to start and stop video recording!

How to Create a Custom Vibration in an Alarm

Vibration
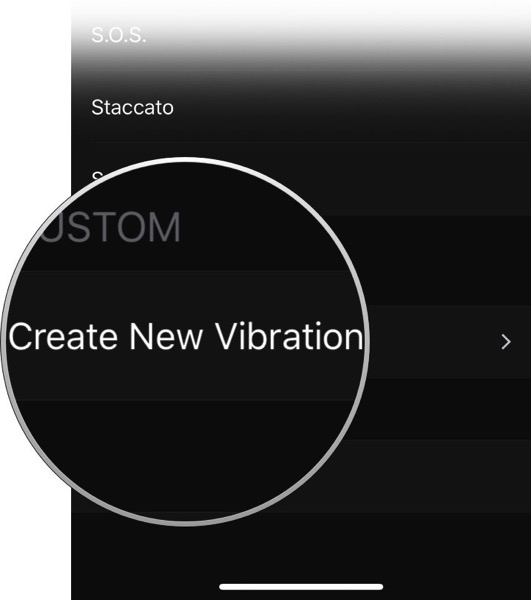
Did you know you could create a custom vibration for an alarm on your iPhone? Why would you want to do this? Let’s say you created an alarm for dinner tonight. When that alarm goes off, you would pull out your phone to see what it is for. If you set a custom vibration for that alarm, you’d know what the alarm is for just by the vibration pattern. You wouldn’t even have to pull out your phone to see what it is for. How do you do this? It’s pretty easy. Open the Clock app and when you create an alarm, select Sound and then Vibration. You’ll see an option for Create New Vibration. From there just tap the vibration you want, and that will be your new vibration for that specific alarm.

Open Clock app>Set an alarm>Sound>Vibrations>Create New Vibration

If you want to see how you do this with a video instruction, check out my tutorial on the Clock app. There’s more to the Clock app than just telling time and setting alarms.

Download Tutor for Notes for the iPhone

IBook CoverMy latest tutorial – Tutor for Notes for iPhone – is now available for download as an iBook. This iBook includes all 20 lessons from the tutorial, and it can be viewed on you iPad, iPhone, and your Mac. Learn the different ways to create a note, recover a deleted note, create checklists and add tables to a note, format the text in a note, add attachments such as photos and links, add sketches, scan documents, protect your notes, share your notes, and more.

Check out the iBook on Tutor for Notes on the iPhone:


This iBook is included with my iOS and Premium Memberships. I have three plans available starting at only $19.99 a year. All plans includes a 14-day free trial. Sign up today!


Sneek Peek: Scanning Documents in the Notes App on the iPad

Did you know you could scan documents into a note on the iPad? All you need to do is open a note, tap on the ‘+’ and select Scan Documents. Now just aim your iPad at your document and the iPad will automatically scan it! It’s that easy. You can also apply filters and crop your document as well. This also works on the iPhone!

If you’d like to see this in action, check out this lesson from Tutor for Notes for iPad.

Automatically Straighten Photos in the Photos App on your iPhone

Straighten

We’ve all taken photos where the horizon was crooked. I seem to do it more often than I want in all honesty. Well did you know that the Photos app on the iPhone (and iPad) can straighten these automatically? All you need to do is open the photo in the Photos app. From their tap on Edit and then tap on the Crop/Rotate tool. When you do this, Photos will automatically straighten the photo for you. You can go in and fine tune it if you’d like, but I find that Photos does a pretty good job of this on it’s own.

Tutor-Notes-iPhone

Tutor for Notes for iPhone now available online

Tutor for Notes for the iPhone

I’m happy to announce my latest tutorial – Tutor for Notes for the iPhone – is now available online. This tutorial includes 20 video lessons on Notes including how to recover deleted notes, format text in a note, add checklists and tables, scan documents, view attachments, secure notes with a lock, and more. If you use Notes on your iPhone, you may want to check out my latest tutorial.


This tutorial is included with our iOS Membership and Premium Membership. Join today to view all the lessons!


Tutor for Notes for the iPhone

Need to Do Some Simple Math? Get Siri to Do It!

Siri math photo

Chances are you’ve ended up somewhere where you needed to do some quick calculations. Perhaps you’re trying to total receipts for an expense report, figure out a tip on your restaurant bill, average your kid’s report card grades, or split a restaurant bill. Either way, instead of launching the Calculator app on your iPhone (this app is oddly missing from the iPad), get Siri to do the math for you. For each the above examples, try the following, making sure to speak the decimal point as “point” or “dot.” “What is a 20% tip on $43?” “What is 113.25 plus 67.29 plus 89.16?” “What is the average of 92 and 96 and 82 and 91?” “What is 235.79 divided by 6?” Siri always shows you the calculation, so you can verify that it heard you correctly, just in case you’re doing this in a loud restaurant. Another tip for you – this works great on the Apple Watch too.

Siri math

Tutor for Notes for the iPhone

Sneak Preview to Tutor for Notes for the iPhone

I have a sneak preview to one of the video lessons from Tutor for Notes for the iPhone. Did you know you could create notes as well as resume editing your last note from the Control Center on the iPhone? It’s pretty easy and I show you how in this preview to my latest tutorial – Tutor for Notes for the iPhone. This tutorial has 20 video lessons on using Notes on your iPhone. I hope to have the tutorial out next week.


Sign up today for my lifetime subscription for only $79.99! This sale ends March 31, so you’ll want to make sure you take advantage of it today! You’ll get a lifetime Premium Membership to the site, which unlocks everything. Think of it as an all-access membership. Only one payment – no subscriptions. Includes a 14-day free trial. Sign up today!


Call 911! Or, with an iPhone or Apple Watch, Invoke Emergency SOS

Emergency SOS photo 1080x675

If you have ever needed to call emergency services from your iPhone, or someone else’s iPhone, you know by almost by definition, such calls take place at stressful times. In all honesty, it can be hard to remember what to do. What if you’ve been in an accident? It might be difficult or impossible to navigate the iPhone’s interface. The good news is in iOS 10.2 and watchOS 3 and later, Apple added the Emergency SOS feature to help.

Emergency SOS does three things:

  1. First, it calls emergency services, using whatever number is appropriate for your location, which could be particularly helpful when you’re traveling abroad.
  2. After your emergency call ends, Emergency SOS sends a text message with your location to emergency contacts that you’ve set up previously in the Health app.
  3. Finally, it displays your Medical ID for first responders so they can be aware of things like medication allergies. You create your Medical ID in the Health app as well.

How you invoke Emergency SOS varies slightly depending on which Apple device you have:

    • On the iPhone 8, iPhone 8 Plus, and iPhone X, you press and hold the side button and either of the Volume buttons until the Emergency SOS slider appears. From their you either drag the Emergency SOS slider to call emergency services right away, or just keep holding the side and Volume buttons. If you continue holding the buttons down, a countdown begins and an alert sounds; at the end of the countdown, the iPhone automatically places the call, a feature that Apple calls Auto Call.

Emergency SOS iPhone

    • On the iPhone 7 and earlier, you rapidly press the side button five times to bring up the Emergency SOS slider. Drag the slider to call emergency services. (The quintuple-click can work on the new iPhones too; it’s an option in Settings > Emergency SOS.)
    • The Apple Watch acts like the newer iPhones. Press and hold the side button on your Apple Watch to bring up the Emergency SOS slider, or you can keep holding the side button to start a countdown after which the Apple Watch will call emergency services automatically via Auto Call. The Apple Watch must be connected to your iPhone, be on a known Wi-Fi network and have Wi-Fi Calling enabled, or be an Apple Watch Series 3 with a cellular plan.

Emergency SOS Apple Watch

I know, you want to test this. It’s only human. To test this in a non-emergency situation, and you can do so without actually placing the call. On both the iPhone and the Apple Watch, there will be a red hangup button you can tap, followed by an End Call or Stop Calling button. Similarly, you can cancel notifications of your emergency contacts.

You’ll also want to stop calls if they’re placed accidentally—we know someone who had his hand in his pocket in such a way as to press the Apple Watch’s side button long enough to start the call, and since he was in a noisy environment, he didn’t hear the alert or notice anything until the 911 service called his iPhone back.

To add emergency contacts—the people who you’d want notified if you were in an accident, follow these steps on your iPhone:

  1. Open the Health app, and tap the Medical ID button at the lower right.
  2. Tap Edit, and then scroll down to Emergency Contacts.
  3. Tap the green + button to add a contact.
  4. Select the desired person, and when prompted, pick their relationship to you.
  5. Tap Done to save your changes.

Two notes. First, if you’re concerned about activating the Auto Call feature inadvertently, you can turn it off in Settings > Emergency SOS on the iPhone, and for the Apple Watch in the Watch app, in My Watch > General > Emergency SOS.

Second, bringing up the screen with the Emergency SOS slider also automatically disables Touch ID and Face ID, such that you must enter your passcode to re-enable them.

I sincerely hope that you never have to use Emergency SOS, but that if you do, it proves to be a faster and more effective way of contacting emergency services.

How to Switch Apps on the iPhone X

IPhone X switch apps photo 1080x675

Since the iPhone X lacks a Home button, how do you now switch between open apps? You used to press twice for the app switcher, now you’ll need to switch apps in a new way. To bring up the app switcher, swipe up from the bottom of the screen to about halfway, and then pause until the app thumbnails appear. The key is the pause. Then you can scroll through your launched apps by swiping horizontally and switch to an app by tapping its thumbnail. While in the app switcher, you can also force-quit a frozen app: press a thumbnail to get a red minus button and tap that button. Alternatively, you can skip the app switcher entirely. Just swipe right on the very bottom of the screen to switch to the previous app. Swiping left switches to the next app.

IPhone X switch apps 1080x1222

Quick-Start

Here’s the Fastest Way to Set Up a New iPhone

Quick-Start

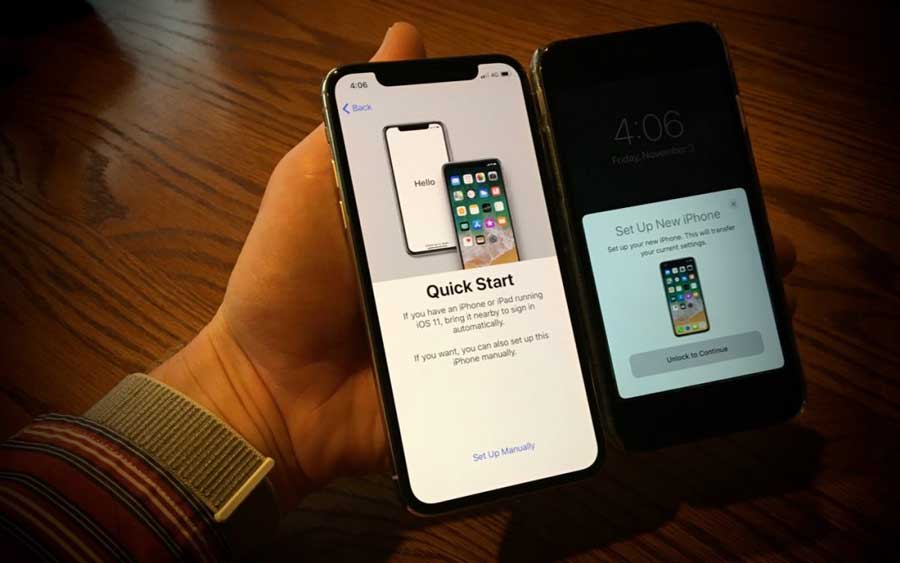
When you replace your old iPhone with a new iPhone, one thing you’ll need to do is transfer your information from your old iPhone to your new one. If your old iPhone is running iOS 11, you can use Quick Start, a new iOS 11 feature that makes the transfer easy. Just turn on your new iPhone, set it next to the old one, and tap Continue when asked whether you want to use your Apple ID to set up your new iPhone. You will see an animation on your new iPhone for you to scan with your old iPhone. Once you’ve done that, follow the rest of the instructions to enable Touch ID or Face ID and then restore your data and settings from your most recent iCloud backup (you can update the backup first if necessary). Leave the two iPhones next to each other while data is being transferred, and if possible, keep the new one plugged in and on Wi-Fi after setup so it can download your apps, photos, and music from Apple’s cloud-based services. It may seem like a lot of steps, but Apple will steer you through them. It’s all pretty easy. Hope it helps!

Quick-Start-process

Tips and Help

What products to use – and not use – to clean your iPhone and iPad

Cleaning-iPhone-photo
All iPhones and iPads pick up fingerprints, and with your iPhone, it’s all too easy to get it dirty with ink, lotion, makeup, dirt, food, and oil. When you are cleaning your iPad or iPhone, resist the urge to spray it with window cleaner, rubbing alcohol, or ammonia, or, even worse, to scrub it with baking soda or Borax. That’s because all iPhones have oleophobic—oil repellent—coatings on their glass surfaces that make it easy to wipe off fingerprints. This coating will wear of naturally on it’s own, but by using these products, that coating will wear off faster than normal. Instead, Apple recommends a soft, lint-free cloth such as you would use for glasses or camera lenses. By the way, even though the iPhone 7 and later have some level of dust and water resistance, it’s important to avoid getting moisture in the openings—most of the time, a lens cloth should be all you need.
Cleaning-iPhone

Apple News

Recycling an Apple product is as easy as it is good for the planet.

Recycle

Recycle any Apple device online or at an Apple Store. For qualifying devices, you’ll receive a gift card online or credit toward a purchase in the store. We’ll either refurbish the device for resale or recycle its materials responsibly.

You can now recycle your old Apple Watch. I’ll be doing this with my first Apple Watch. It’s in good condition, so it’s an easy $75.

Check out how to recycle your older Apple products.

Tips and Help

Follow This Quick Tip to Put Events in the Right Calendar

Set-default-calendars

Apple’s Calendar apps on the Mac, iPad, and iPhone let you manage multiple calendars, some of which may be your private events and others may be shared with family or friends. Did you know that you can set one of these calendars as your default calendar? Most of my events go into a calendar called Dan’s Schedule, this is also my default calendar. So now when I create an even, by default it will go into this calendar. On the Mac, you do this in the Calendar app, in Calendar > Preferences > General > Default Calendar. In the iPad and iPhone, set it in Settings > Calendar > Default Calendar.

Set-default-calendars