Posts

Features of macOS 10.14 Mojave You Won’t Want to Miss

With last year’s macOS 10.13 High Sierra, Apple made no big changes to the Mac OS, instead, they focused on refining the OS and bug fixes. In keeping with their alternating cycle of releases, this year’s macOS 10.14 Mojave includes plenty of new features in addition to bug fixes. Let’s take a look at a few of these.

Dark Mode and Dynamic Desktop
Mojave features a new Dark mode that reverses the standard black-on-white look with light gray text on a dark background throughout the interface. To change it, go to your System Preferences > General. If you find the white window backgrounds too bright on your Mac, Dark mode will be the way you may want to go.

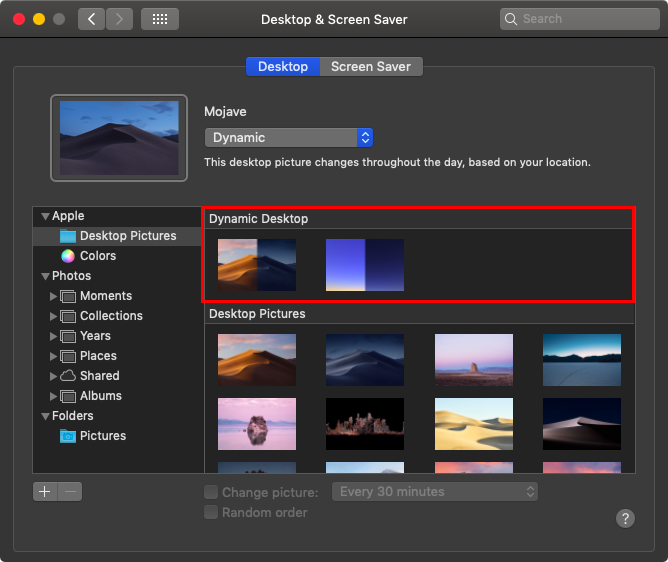
With Dynamic Desktop, your wallpaper or desktop picture will change throughout the day. It really is just eye candy, but it is kind of nice to see the subtle change throughout the day. Select either Mojave or Solar Gradients in System Preferences > Desktop & Screen Saver > Desktop, and your wallpaper will change throughout the day.

Finder Stacks and Groups
Turning to more practical changes, Mojave’s Finder boasts a few new features to help you better navigate a cluttered Desktop and overflowing folders. Control-click the Desktop and choose Use Stacks, and the Finder will combine all the related icons on your Desktop into stacks. It collects them by kind by default, but you can instead have it group them by various dates or even by tags. Click a stack to see what’s inside. This is one of my favorite features!

Quick Actions in the Finder and Quick Look
The Finder’s new tricks go even further, with Quick Actions. Controlled in System Preferences > Extensions > Finder, these quick actions let you rotate or mark up a document within the Finder’s preview pane or a Quick Look window (select a file and press the Space bar). Other quick actions let you create PDFs and trim video.

Most useful of these is the Markup quick action, which gives you most of Preview’s editing tools—cropping, annotating, and more—right in a Finder or Quick Look window. With this feature, you don’t have to open up an app to markup a document. Very useful for marking documents up!

Still and Video Screen Captures, with Editing
Markup also features prominently in Mojave’s new screen capture interface. You’ve long been able to press Command-Shift-3 for a screenshot of the entire screen and Command-Shift-4 for a portion of the screen. Now, press Command-Shift-5 for an interface to those capabilities, plus video screen recording, which was also possible before with QuickTime Player.

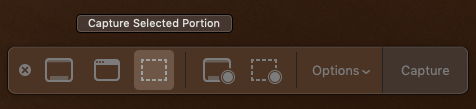
These features may not be new, but they’re a lot easier to use in Mojave, and there are a few new options, such as being able to keep the same size selection across multiple screen captures and include the pointer in screenshots.

Continuity Camera with iPhone
Have you ever wanted to insert a photo or scanned page into an email message or document? Mojave makes this easier with Continuity Camera, a feature that lets you use your iPhone within a Mac app. In Notes, for instance, start a new note, and then choose File > Insert from iPhone > Take Photo/Scan Documents. Either way, your iPhone immediately switches to the appropriate photo or scanning mode, and the resulting photo or scan lands in your note. This works with multiple apps including the iWork app and Mail.

iOS Apps: News, Stocks, Voice Memos, Home
Apple has been emphatic that it is not planning to retire macOS in favor of iOS. However, the company does want to make it easier for developers to write apps that run in both operating systems. As the first phase of that strategy, Apple has ported four iOS apps to the Mac: News, Stocks, Voice Memos, and Home.

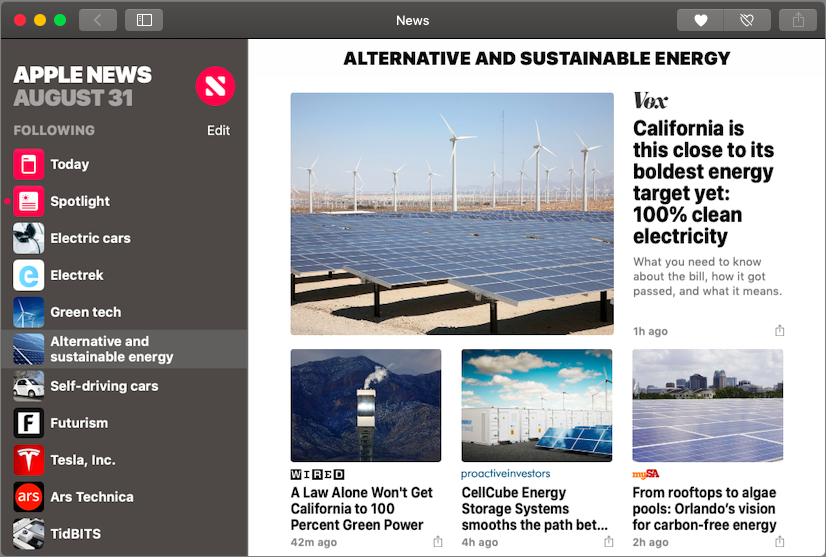
They look a little different from the iOS versions, as they should, but they work similarly, and you can sync their settings and data between your devices via iCloud (look in System Preferences > iCloud on the Mac and in Settings > Your Name > iCloud in iOS).

If you’d like to see more or see some of the features in action, check out my tutorial on What’s New in macOS Mojave.

Tutor for Image Capture for the Mac now available

Learn about Image Capture on the Mac with our tutorial on Image Capture

Have you ever wanted to import your photos from your camera or iPhone, but you didn’t want to use Photos? Maybe you just want to import them into a photo, or maybe you want see the information about a photo such as the ISO, film speed, or aperture used before you import them. What about scanning? How you do scan with your Mac? All this is done with Image Capture, included with your macOS. With Image Capture you can see your photos data, select photos and videos and import them into a photo or PDF, set the DPI or file type when you scan, select where you want to save your scans, and more.

Learn how to use Image Capture with Tutor for Image Capture for your Mac.

Automatically Open your Apps on your Mac

Have you ever wanted to automatically open an app when you start your Mac? In the past this was, and still can be, done through the Mac’s System Preferences. But there is an easier way – through the Dock. All you need to do is make sure the app you want to automatically open is in the Dock, the easiest way to do this is to just open it. From there you hold down the ‘control’ key and click on the app’s icon in the Dock. You’ll see Options. Select this and the select Open at Login. You’ll also see an option to keep the app in the Dock. If you no longer need the app to open automatically, you can deselect it as well. Hope this tip helps!

Why you want to Install Minor Operating System Updates

Install minor updates

You’ve probably noticed that Apple releases updates to iOS, macOS, watchOS, and tvOS nearly every week these days. iOS 11 and macOS 10.13 High Sierra launched only a few months ago, and we’ve already seen ten updates to iOS and seven updates to macOS. Some of these have been to fix bugs, which is great, but more important quite a few have been prompted by the need for Apple to address security vulnerabilities.

Have you installed all these updates, or have you been procrastinating, tapping that Later link on the iPhone and rejecting your Mac’s notifications? I’m not criticizing, I often times tap on Remind Me Later. All too often those prompts come at inconvenient times, although iOS has gotten better about installing during the night, as long as you plug in your iPhone or iPad.

I know, security is dull. Or rather, security is dull as long as it’s present and active. Things get exciting — and not in a good way — when serious vulnerabilities come to light. You may remember back in November 2017, when it was reported that anyone could gain admin access to any Mac running macOS High Sierra. All they had to do was type root for the username and leave the password field blank. This vulnerability one was so bad that Apple pushed Security Update 2017-001 to every affected Mac and rolled the fix into macOS 10.13.2. Exciting times – again not in a good way.

Part of the problem with security vulnerabilities is that they can be astonishingly complex. You may have heard about the Meltdown and Spectre hardware vulnerabilities discovered in January 2018. They affect nearly all modern computers, regardless of operating system, because they take advantage of a design flaw in the microprocessors. Unfortunately, the bad guys—organized crime, government intelligence agencies, and the like—have the resources to understand and exploit these flaws.

But here’s the thing. Hackers don’t stop. New vulnerabilities are discovered on a daily basis. Patching these is a non-stop endeavor by Apple and other companies. Security is an arms race. The good news is if enough people install those updates quickly enough, the attackers will move on to the next vulnerability. You may recognize this as the herd mentality. If we all keep our devices updated, hackers will move on to less vulnerable devices.

The moral of the story? Always install those minor updates. It’s not so much because you will definitely be targeted if you fail to stay up to date, but because if the Apple community as a whole ceases to be vigilant about upgrading, the dark forces on the Internet will start to see macOS and iOS as low-hanging fruit. As long as most people update relatively quickly, it’s not worthwhile for attackers to put a lot of resources into messing with Macs, iPhones, and iPads. Hackers will focus on other non-Apple devices.

That being said, before you install those updates, make sure to update your backups. It’s unusual for anything significant to go wrong during this sort of system upgrade, but having a fresh backup ensures that if anything does go amiss, you can easily get back to where you were before.

Ransomware: What is it, Should You Be Worried, and What Protective Steps Should You Take?

Ransomware photo

You’ve probably heard of the term Malware. Unfortunately it makes headlines regularly these days. The good news is Macs are targeted far less than Windows PCs, but Mac users still need to remain vigilant. A particularly serious type of malware is called “ransomware” because once it infects your computer, it encrypts all your files and holds them for ransom.

Like I said, the good news is despite the virulence of ransomware in the Windows world, where there have been major infections of CryptoWall and WannaCry, only a few pieces of ransomware have been directed at Mac users:

    • The first, called FileCoder, was discovered in 2014. When security researchers looked into its code, they discovered that it was incomplete, and posed no threat at the time.
    • The first fully functional ransomware for the Mac appeared in 2016, a bit of nastiness called KeRanger. It hid inside an infected version of the open source Transmission BitTorrent client and was properly signed so it could circumvent Apple’s Gatekeeper protections. As many as 6500 people may have been infected by KeRanger before Apple revoked the relevant certificate and updated macOS’s XProtect anti-malware technology to block it.

KeRanger message

  • In 2017, researchers discovered another piece of ransomware, called Patcher, which purported to help users download pirated copies of Adobe Premiere and Microsoft Office 2016. According to its Bitcoin wallet, no one had paid the ransom, which was good, since it had no way of decrypting the files it had encrypted.

Realistically, you don’t worry too much. But it’s likely that malware authors will unleash additional Mac ransomware packages in the future, so we encourage you to be aware, informed, and prepared.

Let’s dig into this a bit further. Apple’s Gatekeeper technology protects your Mac from malware by letting you launch only apps downloaded from the Mac App Store, or those that are signed by developers who have a Developer ID from Apple. Since malware won’t come from legitimate developers (and Apple can revoke stolen signatures), Gatekeeper protects you from most malware. However, you can override Gatekeeper’s protections to run an unsigned app. You will only want t do this for apps from developers you trust. And, of course, even if you never override Gatekeeper, you should be careful what you download.

Apple’s XProtect technology takes a more focused approach, checking every new app against a relatively short list of known malware and preventing apps on that list from launching. You’ll want to make sure to leave the “Install system data files and security updates” checkbox selected in System Preferences > App Store. This will ensure that you get XProtect updates. Similarly, install macOS updates and security updates soon after they’re released to make sure you’re protected against newly discovered vulnerabilities that malware could exploit.

App Store prefs XProtect

You may also consider running anti-malware software like Malwarebytes Premium or Mac Internet Security X9. That’s not absolutely necessary, I personally don’t run any on my Macs. Of course, if you have a PC, you will want to install anti-malware solutions. If you want peace of mind though and you regularly visit sketchy parts of the Internet or download dodgy software.

What about backups? Although regular backups with Time Machine are usually helpful, KeRanger tried to encrypt Time Machine backup files to prevent users from recovering their data that way. Similarly, a bootable duplicate updated automatically by SuperDuper or Carbon Copy Cloner could end up replacing good files with encrypted ones from a ransomware-infected Mac, or a future piece of ransomware could try to encrypt other mounted backup disks as well.

The best protection against ransomware is a versioned backup made to a destination that can be accessed only through the backup app, such as an Internet backup service like Backblaze (home and business) or CrashPlan (business only). The beauty of such backups is that you can restore files from before the ransomware encrypted them. Of course, that assumes you’ve been backing up all along.

To reiterate, there’s no reason to worry too much about ransomware on the Mac, but letting Apple’s XProtect keep itself up to date, staying current with macOS updates, and using an Internet backup service will likely protect you from what may come.

For Easier Navigation Swipe Back and Forth between Web Pages

Swipe to navigate photo jpg

For navigation between web pages you’ve visited, Safari offers back and forward buttons, these are represented by arrows in the upper left of Safari’s toolbar. You can also navigate by choosing menu commands and typing keyboard shortcuts — did you know that Command-Left arrow and Command-Right arrow work too? But my favorite was of navigating through my we pages is through gestures. If you’re using a Mac with a trackpad, you can move back and forth between Web pages with a two-fingered swipe left (for back) or right (for forward). If you prefer, you can switch to a three-fingered swipe in System Preferences > Trackpad > More Gestures. Or, if it’s difficult for you to keep exactly two or precisely three fingers on the trackpad, you can choose to swipe with two or three fingers. Lastly, this also works with Chrome, and Firefox.

Swipe to navigate Trackpad jpg

Noteboom News

What’s New in macOS High Sierra now available online

What's New in macOS High Sierra

I’m happy to announce that my What’s New in macOS High Sierra is now available online. In this tutorial we look at what’s new in macOS High Sierra. Apple didn’t add a lot of features to this update, but they did make some under the hood changes including changes that could possibly make your computer faster and save space. The features they did add are more app specific and we’ll look at those too including what’s new in the Photos app, Notes app, Safari, and more. Learn what’s new in What’s New in macOS High Sierra. If you want to learn more about what’s new on your Mac with High Sierra, take a look at our latest tutorial.

Tips and Help

Change Window Size on your Mac from Any Edge or Corner


If you’ve been on a Mac for years, you may know that you can resize nearly any window by dragging its bottom right corner—through. In Mac OS X 10.6 Snow Leopard, there was even a resize handle in that spot. But did you know that, starting in 10.7 Lion, Apple made it possible to resize a window from any edge? You can go to any edge and click and drag to make the window larger or smaller in either direction. Resizing from any corner works as well; click there, and you can drag to resize the window in two directions at once. So if you haven’t updated your habits, try moving the pointer to the edge of a window in the frontmost app, which causes the pointer to change to a double-headed arrow and click and drag. Hope the tip helps!

What's New in macOS Sierra

New Tutorial: What’s New in macOS Sierra

What's New in macOS Sierra

I’m excited to share the news that I have my tutorial on What’s New in macOS Sierra available! This tutorial covers major features of macOS Sierra including Siri on the Mac, new features in Photos including Memories and Places, opening documents in Tabs, optimizing your hard drive, using one-click filtering in Mail, sharing your desktop and documents using iCloud, and using Picture in Picture. The tutorial also covers some minor features as well including rearranging third party menu items, keeping folders on top when sorting by name in the Finder, and  selecting an output device from your volume control in the menu bar. If you are thinking of upgrading to macOS Sierra, we’ll show you what’s new in our latest tutorial.

View which lessons are included with What’s New in macOS Sierra.

Watch these videos today with our Premium Membership – you can save 50% off our standard rate and join for only $39 a year! That’s equivalent to only $3.25 a month! This offer includes our 14-day free trial! Start your free trial today and see if our tutorials are a good fit for you!