Posts

Tutor for iTunes on the Mac now available online

Learn how to work with iTunes with our latest tutorial – Tutor for iTunes for the Mac

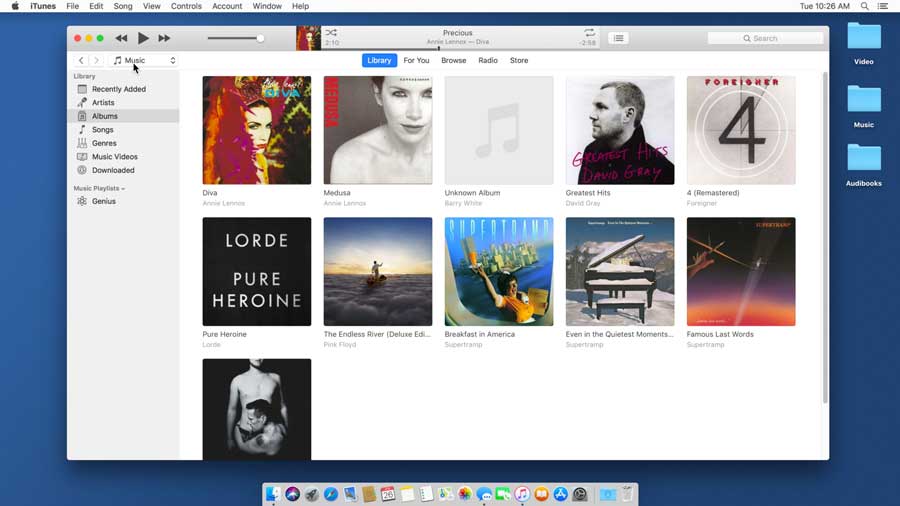
In this tutorial we look at how we manage our media, such as music and movies in iTunes on the Mac. We first look at the interface and how we get around iTunes. From there we look at individual features including setting the sound quality and using the MiniPlayer interface. We also look at how we import our media into iTunes and once it is imported how we can change the information and media kind or type. From there we look at the various types of playlists we can create and how we keep them organized. We also look at how iTunes keeps your media organized and how we can turn that off if you’d rather organize your media yourself. Have an iPhone or an iPad? With iTunes we can manage our iOS devices including backup, update, and restore as well as sync our media with your iSO device.

We show you how all this works in Tutor for iTunes for the Mac.

Automatically Open your Apps on your Mac

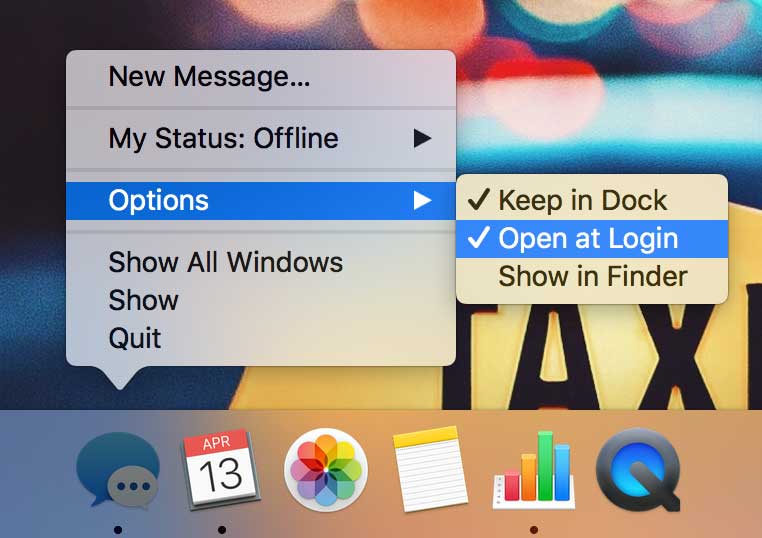
Have you ever wanted to automatically open an app when you start your Mac? In the past this was, and still can be, done through the Mac’s System Preferences. But there is an easier way – through the Dock. All you need to do is make sure the app you want to automatically open is in the Dock, the easiest way to do this is to just open it. From there you hold down the ‘control’ key and click on the app’s icon in the Dock. You’ll see Options. Select this and the select Open at Login. You’ll also see an option to keep the app in the Dock. If you no longer need the app to open automatically, you can deselect it as well. Hope this tip helps!

Viewing YouTube Videos using Picture-in-Picture on your Mac

Youtube pip

You may know that with some videos you can view them in picture-in-picture mode on your Mac. A video from vimeo, as an example, will have a small icon representing picture-in-picture. When you click on it, the video will float above all your windows and move to a corner on your Mac, thereby allowing you to view the video while working. You can resize it and move it to a different corner just by dragging it. I use this quite a bit.

But did you know you could do this with YouTube videos too? You can’t do it by finding an icon nor by control-clicking on it (holding down the control key and clicking on it). So how do you do this? You need to control-click on it twice, yes, two times. When you control click on it a second time, you’ll get a new menu with the picture-in-picture option. Select this and your YouTube video will pop out above all your other windows and move to a corner on your Mac. So the next time you want to watch a video from YouTube on your Mac, control-click on it twice – and keep working. :)

Re-organize your Preference Panes on a Mac

Sort options

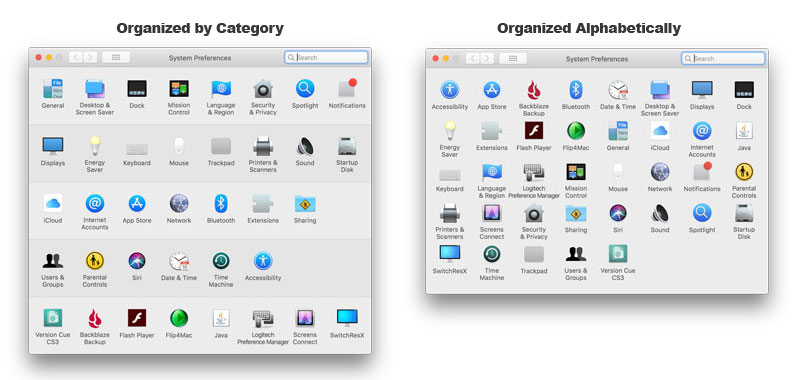
Did you know you could re-organize your preference panes in the System Preferences on a Mac? If you don’t like them grouped or organized by category, you can also organize them or sort them alphabetically. It’s easy – just open your System Preferences and go to the Menu Bar. From there select View. You’ll see two options:

  • Organize by Category
  • Organize Alphabetically

Just select how you want your preference panes to be sorted and the Mac will re-organize your preference panes for you. Bonus tip, if you select Customize under the View menu, you can hide preference panes too. :)

Menu Bar

Tutor for Notes for the Mac

Tutor for Notes for the Mac is now available online

I am happy to announce Tutor for Notes for the Mac is now available! I recently had a pol on what tutorials should I do next and Notes showed up second, so here it is! This tutorial includes 18 video lessons and is just over an hour long total. I hope you find it helpful in your endeavor to be more productive on your Mac!

Not a member of the site? I have two free lessons for you to preview the tutorial!

Check out Tutor for Notes for the Mac.

Want to view all the lessons? We have three affordable plans available for you to become a Premium Member. Premium Membership unlocks everything and you can try it out for free for 14 days!

Ransomware: What is it, Should You Be Worried, and What Protective Steps Should You Take?

Ransomware photo

You’ve probably heard of the term Malware. Unfortunately it makes headlines regularly these days. The good news is Macs are targeted far less than Windows PCs, but Mac users still need to remain vigilant. A particularly serious type of malware is called “ransomware” because once it infects your computer, it encrypts all your files and holds them for ransom.

Like I said, the good news is despite the virulence of ransomware in the Windows world, where there have been major infections of CryptoWall and WannaCry, only a few pieces of ransomware have been directed at Mac users:

    • The first, called FileCoder, was discovered in 2014. When security researchers looked into its code, they discovered that it was incomplete, and posed no threat at the time.
    • The first fully functional ransomware for the Mac appeared in 2016, a bit of nastiness called KeRanger. It hid inside an infected version of the open source Transmission BitTorrent client and was properly signed so it could circumvent Apple’s Gatekeeper protections. As many as 6500 people may have been infected by KeRanger before Apple revoked the relevant certificate and updated macOS’s XProtect anti-malware technology to block it.

KeRanger message

  • In 2017, researchers discovered another piece of ransomware, called Patcher, which purported to help users download pirated copies of Adobe Premiere and Microsoft Office 2016. According to its Bitcoin wallet, no one had paid the ransom, which was good, since it had no way of decrypting the files it had encrypted.

Realistically, you don’t worry too much. But it’s likely that malware authors will unleash additional Mac ransomware packages in the future, so we encourage you to be aware, informed, and prepared.

Let’s dig into this a bit further. Apple’s Gatekeeper technology protects your Mac from malware by letting you launch only apps downloaded from the Mac App Store, or those that are signed by developers who have a Developer ID from Apple. Since malware won’t come from legitimate developers (and Apple can revoke stolen signatures), Gatekeeper protects you from most malware. However, you can override Gatekeeper’s protections to run an unsigned app. You will only want t do this for apps from developers you trust. And, of course, even if you never override Gatekeeper, you should be careful what you download.

Apple’s XProtect technology takes a more focused approach, checking every new app against a relatively short list of known malware and preventing apps on that list from launching. You’ll want to make sure to leave the “Install system data files and security updates” checkbox selected in System Preferences > App Store. This will ensure that you get XProtect updates. Similarly, install macOS updates and security updates soon after they’re released to make sure you’re protected against newly discovered vulnerabilities that malware could exploit.

App Store prefs XProtect

You may also consider running anti-malware software like Malwarebytes Premium or Mac Internet Security X9. That’s not absolutely necessary, I personally don’t run any on my Macs. Of course, if you have a PC, you will want to install anti-malware solutions. If you want peace of mind though and you regularly visit sketchy parts of the Internet or download dodgy software.

What about backups? Although regular backups with Time Machine are usually helpful, KeRanger tried to encrypt Time Machine backup files to prevent users from recovering their data that way. Similarly, a bootable duplicate updated automatically by SuperDuper or Carbon Copy Cloner could end up replacing good files with encrypted ones from a ransomware-infected Mac, or a future piece of ransomware could try to encrypt other mounted backup disks as well.

The best protection against ransomware is a versioned backup made to a destination that can be accessed only through the backup app, such as an Internet backup service like Backblaze (home and business) or CrashPlan (business only). The beauty of such backups is that you can restore files from before the ransomware encrypted them. Of course, that assumes you’ve been backing up all along.

To reiterate, there’s no reason to worry too much about ransomware on the Mac, but letting Apple’s XProtect keep itself up to date, staying current with macOS updates, and using an Internet backup service will likely protect you from what may come.

Latest-Tutorials

What’s New in macOS High Sierra available as an iBook

What's New in High Sierra IBook Cover

I am happy to announce that my latest tutorial, What’s New in macOS High Sierra, is now available as an iBook. If you are a Premium Member, you can download it for free from our site. Non-members can find it in the iBook store. This tutorial includes all the lessons from What’s New in macOS High Sierra available online.

I am a Premium Member – I’ll sign in to download the iBook.

I am not a Premium Member – take me to the iBook Store.

I’m interested in becoming a Premium Member.

Apple News

Recycling an Apple product is as easy as it is good for the planet.

Recycle

Recycle any Apple device online or at an Apple Store. For qualifying devices, you’ll receive a gift card online or credit toward a purchase in the store. We’ll either refurbish the device for resale or recycle its materials responsibly.

You can now recycle your old Apple Watch. I’ll be doing this with my first Apple Watch. It’s in good condition, so it’s an easy $75.

Check out how to recycle your older Apple products.

Tips and Help

Follow This Quick Tip to Put Events in the Right Calendar

Set-default-calendars

Apple’s Calendar apps on the Mac, iPad, and iPhone let you manage multiple calendars, some of which may be your private events and others may be shared with family or friends. Did you know that you can set one of these calendars as your default calendar? Most of my events go into a calendar called Dan’s Schedule, this is also my default calendar. So now when I create an even, by default it will go into this calendar. On the Mac, you do this in the Calendar app, in Calendar > Preferences > General > Default Calendar. In the iPad and iPhone, set it in Settings > Calendar > Default Calendar.

Set-default-calendars

Tips and Help

Change Window Size on your Mac from Any Edge or Corner


If you’ve been on a Mac for years, you may know that you can resize nearly any window by dragging its bottom right corner—through. In Mac OS X 10.6 Snow Leopard, there was even a resize handle in that spot. But did you know that, starting in 10.7 Lion, Apple made it possible to resize a window from any edge? You can go to any edge and click and drag to make the window larger or smaller in either direction. Resizing from any corner works as well; click there, and you can drag to resize the window in two directions at once. So if you haven’t updated your habits, try moving the pointer to the edge of a window in the frontmost app, which causes the pointer to change to a double-headed arrow and click and drag. Hope the tip helps!

Tips and Help

4 Ways to Force-quit a Frozen Mac App

tip frozen app force quit

Even with the best Mac apps… freezes, crashes, hangs… they happen. What do you do when your favorite Mac app crashes or freezes? Force quit it. When you force quit an app, it forces the app to quit when it does not want to. Now when you do this, there is a chance that any unsaved changes will be lost, so you’ll want to use this as a last case scenario when having an issue with an app.

Here are four ways you can force-quit an app that’s not responding:

  1. Click the Apple menu in the upper right hand corner of your display and choose Force Quit (or press Command-Option-Escape), select the offending app, and click Force Quit.
  2. Option-right-click (or Control-Option-click) the frozen app’s Dock icon and choose Force Quit (this is how I usually force quit an app).
  3. To force-quit the frontmost app immediately, press Command-Shift-Option-Escape.
  4. Open Activity Monitor, select the process in the list, click the X button on the toolbar, and click Force Quit.

If one method doesn’t work, try it a second time, and if that doesn’t work, try another. If nothing works, restart your Mac. Remember that you may lose unsaved changes when force-quitting an app.

Tips and Help

Peek inside Files and Folders on Your Mac with Quick Look

Quick Look Desktop photo
Have you ever found yourself wanting to take a quick look at the contents of a file? Sometimes Finder icons hint at their file’s contents, but if you find yourself opening file after file to look at the contents quickly, the Mac has a little-known feature just for you: Quick Look. With Quick Look you can see the contents of a file without ever opening it. To give it a try, find a file in your Finder, click it once to select it, don’t open it, just select it. Now that the file is selected, press the Space bar. If it’s a supported type of file, Quick Look displays a window showing the contents of the file. Press the Space bar again to close the window.

Quick Look Excel

How does this work with a document that has multiple pages? With a document with multiple pages you’ll see thumbnails that you can scroll through using your mouse or trackpad, or by pressing the Page Up/Page Down keys. But you aren’t limited to just viewing a file: you can also open or share the file with Quick Look. Click the Open With button to open the file in its default app, or click the Share button in the upper right to send the file to someone else via email, Messages, or another sharing service.

If you need to scan through a set of files in a folder, you can navigate between them using the arrow keys while the Quick Look window remains open—how you move among the files depends on the Finder window’s view. In List view, for instance, using the Up and Down arrow keys can be a great way to browse through a collection of pictures. You can even interact with the Finder while using Quick Look, which means you can delete an unwanted photo by pressing Command-Delete while previewing it. I use this quite a bit on my Mac when I need to go through a folder full of files.

Quick Look also works well for comparing multiple similar files. All you need to do is select a number of files and then press the Space bar to open them all in Quick Look. To cycle through your selection, you use the Left and Right arrow keys; there are also Forward and Back buttons that appear near the top left of the Quick Look window. Next to those buttons is a Thumbnail button that displays the selected files in a grid—click any thumbnail to focus on just that item. To remove the distraction of your Desktop, click the Zoom button in a Quick Look window. You can start a slideshow from there. Another way to get to a zoomed Quick Look window is to select the files in the Finder and then press Option-Space.

Quick Look Penguins

Quick Look will not let you look at every file type, but out of the box, Quick Look supports text files, RTF files, HTML files, images, audio, video, PDFs, iWork documents, Microsoft Office files, and even fonts. Third-party apps can extend Quick Look to support proprietary formats, too, and developers have even released independent Quick Look generators, as they’re called.

Although it’s used mostly in the Finder, Quick Look is available elsewhere. For example, if you’re in an Open dialog, you can select a file and press the Space bar to preview it right there, another feature I use quite a bit. When restoring a file in Time Machine, use Quick Look to see if it’s the version you want. You can also preview an attachment in Messages by selecting it and pressing the Space bar.

Finally, note that if your Mac has a newer Apple trackpad, such as the Magic Trackpad 2, you can invoke Quick Look by force-touching a Finder icon (press deeply until you feel a click) instead of pressing the Space bar.

Quick Look takes just a moment to learn, but it can save you hours of time poring through files on your Mac! It’s well worth the investment time to learn how to use Quick Look.
Tips and Help

Silence or Mute Audio-playing Tabs in Safari

Tip mute audio Safari

Do Web sites that auto-play videos or ads drive you mad? They do me. Especially when I reopen Safari and several of tabs that I had open earlier open back up and the ads or videos start playing again. Since OS X 10.11 El Capitan, Safari can put an end to this on your Mac. If you have multiple tabs open, whenever audio is playing in a tab, an audio icon appears next to the name of the tab and at the right of Safari’s Smart Search field. To mute the audio in a tab with this audio icon, just click on the audio icon. If you’ve ended up with multiple tabs playing, you can mute all those except the current tab by Option-clicking either of those audio icons. And, finally, click and hold the audio icon in the Smart Search field for a menu with Mute and Unmute commands, and a list of all tabs that contain audio. I hope the tip helps!

Tip mute audio Safari